
 Whitepapers
 Videos
 Guides
 Webinars
 Case Studies
As Atlassian consultants, we here at Isos Technology have a lot of visibility into how many large organizations around the world deploy and run Atlassian (and specifically Jira) applications. As part of that effort we highly recommend, even for internally hosted instances, all web traffic coming in and out of your Atlassian instances be encrypted. You would be surprised to know that many large organizations, for good or not so good reasons, run some or all of their Atlassian stack unencrypted. Some do run their services encrypted, which is great. But they use self-signed certificates which can cause interoperability issues with browsers and other applications trying to integrate with Atlassian applications.
The very best way to undergo this process is to work with the team that runs your IT infrastructure to get all the server and client side certificates in place. However if that is not possible and you are tempted to run your Atlassian apps unencrypted, please instead consider generating a free, wildcard certificate you can deploy on any internal Atlassian server. Using the LetsEncrypt service makes this a pretty easy / fast effort
Here's a quick guide on how to do just that..
Step 1: Pick a domain to use.
For all the servers you want to secure pick a domain you want all your servers to be under (like jira.foo.com). For this example we are going to use *.safteysquad.online
Make sure you (or someone on your team) is able to modify the public and private DNS for this domain.
Step 2: Generate the certificate using the LetsEncrypt Docker container
The LetsEncrypt service requires you to run some utilities to generate a certificate. Here's the steps it takes to use said utility:
- Install Docker: Install Docker for your favorite OS.
- Make subdir where all your certificates will live. ie /home/user/atlascerts/
-
Run Docker command to generate certificates: Here's our sample command.
docker run -v "/home/user/atlascerts:/etc/letsencrypt" --entrypoint="/usr/local/bin/certbot" -it certbot/certbot certonly --manual --preferred-challenges dns --email michael.march@isostech.com --server https://acme-v02.api.letsencrypt.org/directory --agree-tos -d *.safetysquad.online
Saving debug log to /var/log/letsencrypt/letsencrypt.log
In which you'll see this output (answer "Y" to both questions):
Saving debug log to /var/log/letsencrypt/letsencrypt.log
Plugins selected: Authenticator manual, Installer None
- - - - - - - - - - - - - - - - - - - - - - - - - - - - - - - - - - - - - - - -
Would you be willing to share your email address with the Electronic Frontier
Foundation, a founding partner of the Let's Encrypt project and the non-profit
organization that develops Certbot? We'd like to send you email about our work
encrypting the web, EFF news, campaigns, and ways to support digital freedom.
- - - - - - - - - - - - - - - - - - - - - - - - - - - - - - - - - - - - - - - -
(Y)es/(N)o: y
Obtaining a new certificate
Performing the following challenges:
dns-01 challenge for safetysquad.online
- - - - - - - - - - - - - - - - - - - - - - - - - - - - - - - - - - - - - - - -
NOTE: The IP of this machine will be publicly logged as having requested this
certificate. If you're running certbot in manual mode on a machine that is not
your server, please ensure you're okay with that.
Are you OK with your IP being logged?
- - - - - - - - - - - - - - - - - - - - - - - - - - - - - - - - - - - - - - - -
(Y)es/(N)o: y
Next you'll need to update your DNS with this information:
Please deploy a DNS TXT record under the name
_acme-challenge.safetysquad.online with the following value:
8-7odvwn6L7PzCM-Kakr7Nfx_sqXHrz6JsJCzsLzl8E
Before continuing, verify the record is deployed.invalid.
In our example we are going to update our domain hosted via Namecheap.com:
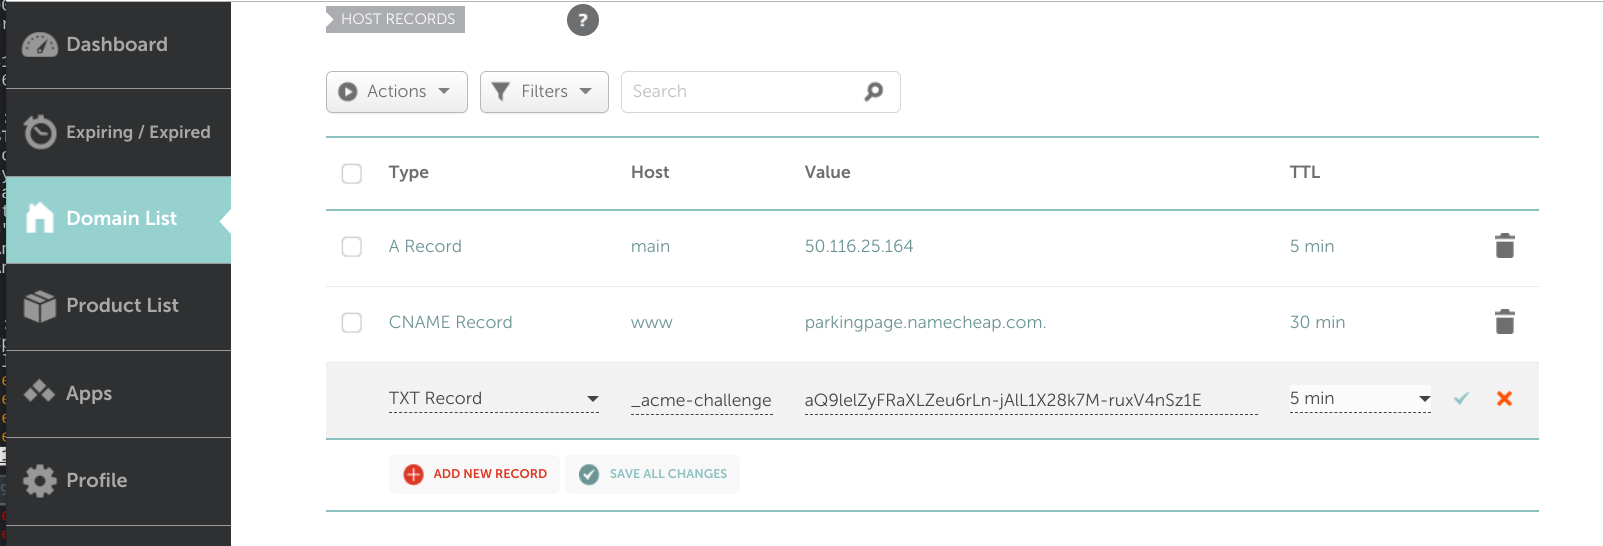
.. and if successful, you'll see this:
- - - - - - - - - - - - - - - - - - - - - - - - - - - - - - - - - - - - - - - -
Press Enter to Continue
Waiting for verification...
Cleaning up challenges
IMPORTANT NOTES:
- Congratulations! Your certificate and chain have been saved at:
/etc/letsencrypt/live/safetysquad.online/fullchain.pem
Your key file has been saved at:
/etc/letsencrypt/live/safetysquad.online/privkey.pem
Your cert will expire on 2019-08-25. To obtain a new or tweaked
version of this certificate in the future, simply run certbot
again. To non-interactively renew *all* of your certificates, run
"certbot renew"
- Your account credentials have been saved in your Certbot
configuration directory at /etc/letsencrypt. You should make a
secure backup of this folder now. This configuration directory will
also contain certificates and private keys obtained by Certbot so
making regular backups of this folder is ideal.
- If you like Certbot, please consider supporting our work by:
Donating to ISRG / Let's Encrypt: https://letsencrypt.org/donate
Donating to EFF: https://eff.org/donate-le
- We were unable to subscribe you the EFF mailing list because your
e-mail address appears to be invalid. You can try again later by
visiting https://act.eff.org.
Step 3: Convert the SSL certificates from Apache to Tomcat format
By default the SSL certificates generated by the Certbot system are ready for Nginx or Apache. In this example we want to put the SSL certs directly in Jira's Tomcat.
The openssl command parameters to do that are as follows:
openssl pkcs12 -export -out /path/to/jira/ssl/certs/bundle.pfx -inkey /home/user/atlascerts/certbot/live/safetysquad.online/privkey.pem -in /home/user/atlascerts/certbot/live/safetysquad.online/cert.pem -certfile /home/user/atlascerts/certbot/live/safetysquad.online/chain.pem -password pass:apassword
Step 4: Convert the Jira to use the new SSL cert.
One mod to the server.xml file and you are almost in business.
Here's the diff of the changes we made to make this new SSL configuration work:
35c35
< <Connector port="9443" relaxedPathChars="[]|" relaxedQueryChars="[]|{}^\`"<>"
---
> <Connector port="8080" relaxedPathChars="[]|" relaxedQueryChars="[]|{}^\`"<>"
38,41c38
< acceptCount="100" disableUploadTimeout="true" bindOnInit="false"
< scheme="https" secure="true" SSLEnabled="true"
< keystoreFile="/root/certbot/live/safetysquad.online/bundle.pfx" keystorePass="apassword"
< clientAuth="false" sslProtocol="TLS" keystoreType="PKCS12"/>
---
> acceptCount="100" disableUploadTimeout="true" bindOnInit="false"/>
Step 5: Test out the new SSL cert.. then you are done!
Fire up Jira and try a 'wget' command. If the cert is installed correctly, it should pull down content without error or warnings.
mmarch@localhost:~$ wget https://jira.safetysquad.online:9443/secure/Dashboard.jspa
--2019-05-27 04:57:42-- https://jira.safetysquad.online:9443/secure/Dashboard.jspa
Resolving jira.safetysquad.online (jira.safetysquad.online)... 96.126.96.112
Connecting to jira.safetysquad.online (jira.safetysquad.online)|96.126.96.112|:9443... connected.
HTTP request sent, awaiting response... 200
Length: unspecified [text/html]
Saving to: ‘Dashboard.jspa’
Dashboard.jspa [ <=> ] 39.47K --.-KB/s in 0.07s
2019-05-27 04:57:42 (579 KB/s) - ‘Dashboard.jspa’ saved [40422]